Searches can be performed on pawn information submitted to the LInX data warehouse. This functionality is available to both Tactical and Analytical users, based on their user rights.
The search results will only display pawn data that has been submitted to LInX by participating law enforcement agencies.
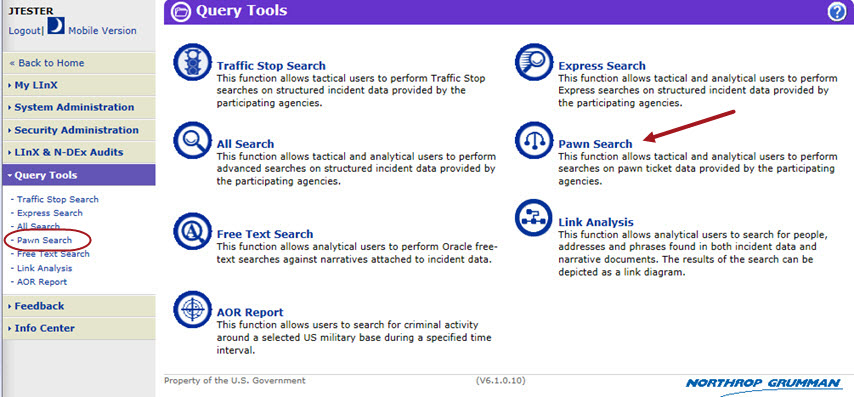
Tactical and Analytical LInX users can access Pawn Search either from the Query Tools title page, or from the menu bar located along the left side of the screen. The Pawn Search page allows users to enter search criteria that can be used to generate search results. This page also provides the capability to Save/Watch and Load search queries.
The Pawn Search page allows users to enter search criteria that can be used to generate search results. This page also provides the capability to Save and Load search queries.
![]()
A search can be performed by entering search criteria in any of the Property, Person, Address, or Pawn Characteristics fields; only one field is required to begin a search.
Ø Purpose Code (defaulted to Criminal Justice (C))
Ø Justification (highlighted in yellow if required)
Ø Property Type
Ø Make
Ø Model
Ø Description (free text field)
Ø Serial Number
Ø Primary/Secondary Color [multi-select pop-up selector]
Ø Last Name (of person who pawned the property)
Ø First Name
Ø Middle Name
Ø Full Name/Alias
Ø Name Thesaurus [check-box]
Ø DOB or Year of Birth
Ø Current Age or Current Age Range
Ø SSN
Ø Driver's License Number
Ø Street Address [Pawn Shop or Pawner]
Ø Address Thesaurus [check-box]
Ø City
Ø State [drop-down selector]
Ø Zip
Ø Pawn Shop Name
Ø Pawn Ticket Number
Ø Date Pawned or Date Pawned Range
Ø Map Selection [(Change Map Region...) link]
Ø Neighborhood (drop-down selector)
Any field can be used to initiate a search. For example, entering descriptive words or terms into the Description field will bring back records containing the same words or terms, such as ”camera” or ”Rolex.”
Pawn Search Tips
Ø Tip: Search for ”New in Box” or ”NIB” in the Description field to identify unused products that have been pawned and the identities of the person(s) pawning those items.
Ø Tip: It is not recommended that the Pawn Type field be utilized to conduct searches for pawned items, as that field may be populated with a code number for the Pawn type rather than an actual pawn type. Use the Description field to enter the description of the pawned property being queried upon.
Ø Tip: Searching on a person will bring up all the pawn records related to that name, and can help identify individuals who pawn goods frequently. Then conduct a structured person search (All Search, Express Search) to see any past history of other activity.
Ø Tip: Compare the addresses of individuals pawning goods with the area of the pawn activity. Items stolen are frequently pawned in a neighboring jurisdiction to the pawner's address.
Exact and thesaurus Search Options
There are two different levels of complexity available for users to conduct searches, depending on the field(s) being searched. The options available are:
Exact Search: limits the search results to those records that are an exact match to the search criteria. Results will only be returned if they meet all the criteria entered in the various search characteristics categories. Results will be returned for exact spelling or numerical matches.
Exact Searches may be conducted for Name and/or Address queries.
An Exact Search will be conducted for Name and/or Address queries unless the respective Thesaurus check-boxes are checked.
Thesaurus Search: uses a static LInX thesaurus index to expand the search results to include structured records that contain terms that are grouped together according to similarity of meaning to the search term(s), in addition to those records that contain exact matching terms to the search criteria. Results will be returned for exact spelling or numerical matches, and related terms.
Thesaurus Searches may be conducted for Name and/or Address queries.
Examples of Thesaurus entries using the Person Full Name index include:
William - Will, Willie, Bill, Billy
Steven - Stephen, Steve, Steph
Kenneth - Ken, Kenny
Examples of Thesaurus entries using the Full Street Address index include:
Street - St, Str, Strt
Road - Rd
Avenue - Av, Ave
1st - First
To conduct thesaurus Name searches, click the Use Name Thesaurus check-box to the right of the Full Name/Alias field to select the option.
![]()
To conduct thesaurus Address searches, click the Use Address Thesaurus check-box to the right of the Street Address field to select the option.
![]()
The Use Name Thesaurus and Use Address Thesaurus options may be selected within the Express Search, All Search, Pawn, and Link Analysis query screens. The desired default search types can also be set by the user on the Set Preferences screen, under My LInX.
The following chart compares Exact Search and Thesaurus Search.
|
Exact Search |
Thesaurus Search |
Full Name/Alias Field |
LInX will identify structured records containing a full name/alias that exactly matches the user-entered search term(s). |
LInX will identify structured records containing a full name/alias that match exactly the user-entered search term(s) or match entries found in a static LInX thesaurus index. |
First Name, Middle Name, Last Name Fields |
LInX will identify structured records containing first name, middle name, last name fields that exactly match the user-entered search term(s). |
LInX will identify structured records containing first name, middle name, last name fields that exactly match the user-entered search term(s) or match entries found in a static LInX thesaurus index. |
Full Name/Alias Field Combined with Other Fields |
LInX will identify structured records containing a full name/alias that exactly match the user-entered search term(s) and that also contain an exact match for the user-entered search term(s) in the other field(s). |
LInX will identify structured records containing a full name/alias that exactly match the user-entered search term(s) or match entries found in a static LInX thesaurus index, and that also contain an exact match for the user-entered search term(s) in the other field(s). |
First Name, Middle Name, Last Name Fields Combined with Other Fields |
LInX will identify structured records containing first name, middle name, last name fields that exactly match the user-entered search term(s) and that also contain an exact match for the user-entered search term(s) in the other field(s). |
LInX will identify structured records containing first name, middle name, last name fields that exactly match the user-entered search term(s) or match entries found in a static LInX thesaurus index and that also contain an exact match for the user-entered search term(s) in the other field(s). |
Use of Wildcards
Exact Search can also be used with wildcards to expand or speed up the search while still limiting it to the search criteria entered by the user:
Ø A wildcard (%) can be used in an exact search to bring up additional records that reflect the criteria including the wildcard, such as ”Doe, J%” for all individuals with the last name of "Doe" and a first name beginning with the letter "J".
Ø If the search involves alphanumerical values, such as a partial license plate, the location of the wildcard within the number sequence will determine the results that are returned (see following table).
Ø Wildcards can be used to speed up a search by inserting a wildcard after the search criteria, which has the effect of limiting the search results that begin with the criteria instead of containing the criteria anywhere within the record. Using the wildcard in this way may speed up the search if time is a concern and the possible number of candidate returns is large, such as Street or City names.
Ø Wildcards can also be used in Driver’s License Numbers, Street Names, City Names, Street Numbers, and Social Security Numbers.
Tip: Because of various spellings of names, a wildcard (%) can be used if the correct spelling of a person's name is unknown (e.g., Gonzale% to retrieve Gonzales and Gonzalez).
Tip: Use wildcards (%) for name queries where the person may have more than three names. The wildcard can be placed before, and/or after the Last Name. It may be valuable to conduct separate searches of both the Middle and Last Name fields. |
The following chart provides examples of the results returned when using wildcards in Exact Search queries:
Exact Search Wildcard Placement Examples |
Results |
Names (People, Places) |
|
J% Doe |
All individuals with first names starting with ”J” and last name of ”Doe” (and any aliases on records as the letter ”J”). |
Cent% Street |
Street Names starting with ”Cent”, such as Central, Center, or Centre. |
Oak% Street (wildcard used to speed results) |
Street Names of ”Oak”, limiting the search to Street Names of Oak, or starting with the word Oak, such as Oakdale. |
Numbers and Alphanumeric Sequences |
|
%123 |
Sequences ending in ”123” and sequences with ”123” in the middle, or results of ”123”, if that is the entire record (such as ”123 Main Street”). |
123% |
Sequences starting with ”123”. |
%12%3% |
Sequences with known characters in this order. |
123 (no wildcards) |
Returns results of ”123” alone or "123" anywhere in the sequence, in any field that is noted with the word ”contains”. |
Search only last 2 years of data
An initial query may be limited to search data for the most recent 2 years, by clicking on the Last 2 years hyperlink next to the Incident Date Range on the Query screen. Selecting this option will automatically pre-populate the Date Range fields, extending back 2 years from the current system date.
When the Date Range fields are pre-populated to search the last 2 years of data, clicking on the Clear hyperlink will remove the limitation, and allow searching of older data.
![]()
![]()
Note: if the Date Range is manually entered, the Last 2 years link will remain and the Clear link will not be displayed.
The default Pawn Search setting is to search the designated default neighborhood, as defined by the regional system administrator. Typically this would include all local contributing agencies; meaning that the search includes all data in the data warehouse from all local sources.
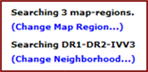
The Neighborhood drop-down selector allows a user to access and select other existing System Defined and User Defined neighborhoods.
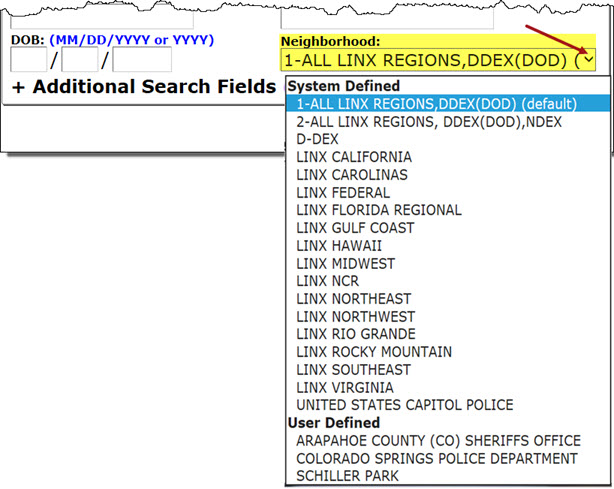
To select an existing neighborhood from the Neighborhood drop-down menu, just click on the desired neighborhood. The neighborhood field will automatically update with the name of the selected neighborhood.
The Neighborhood button allows a user to access the Neighborhood Selection menu and select one or more agencies, sites, and/or Partner systems against which to conduct a search. The results will be filtered to reflect only the data from the selected source(s) when the user limits the search to one or more source agencies, rather than all agencies.

Selecting a Neighborhood:
When the Neighborhood
button is selected, the Neighborhood
Selection menu and a description of the screen functionality are
displayed. Additional help for Neighborhood
Selection can be found within the Neighborhood
Selection functionality by clicking on the Online Help button [![]() ] located in the
upper right-hand corner of the Neighborhood
Selection screen.
] located in the
upper right-hand corner of the Neighborhood
Selection screen.

Selection Status:
The text appearing on the Query Tools - Pawn Search banner provides the user with the selection status. If there are no neighborhoods listed, or no neighborhood has been identified as the ”default” neighborhood, the local agencies of the current LInX system, plus whichever remote system(s) that may be included as a default by the Regional Administrator, will be the default agency source criteria for all searches.

In addition to the banner, the text appearing to the left, below the navigation menu also provides the user with the neighborhood selection status. If there are no neighborhoods listed, or no neighborhood has been identified as the ”default” neighborhood, the local agencies of the current LInX system, plus whichever remote system(s) that may be included as a default by the Regional Administrator, will be the default agency source criteria for all searches.
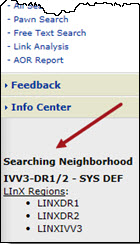
When a different neighborhood selection is made, the selection status changes to reflect the name of the newly-selected neighborhood.
The Map Selection functionality provides the user with the ability to search a specified geographic area. When the (Change Map Region …) link is selected, the Map Selection screen opens in a separate window.
Selection Status:
The text appearing above the (Change Map Region ...) link on the query screen provides the user with the selection status, which corresponds to what is selected in the Neighborhood Selection. If no neighborhood is selected under the Neighborhood Selection menu, then the system default will be used, and no map regions will be specified.
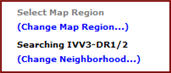
When a Map Region is selected, the Neighborhood selection status will change to CUSTOM. The neighborhood will automatically be modified to include the selected regions/agencies. The neighborhood can then be modified further through the Neighborhood Selection screen.
Mousing over the Change Map Region link will display a pop-up message containing the name(s) of the map region(s) selected.
Additional help for Map
Selection can be found within the Neighborhood
Selection functionality by clicking on the Online Help button [![]() ] located in the
upper right-hand corner of the Neighborhood
Selection screen.
] located in the
upper right-hand corner of the Neighborhood
Selection screen.
The N-DEx portal search requires users to enter a search purpose, (e.g., Criminal Justice, Criminal Justice Employment, or Administrative File Maintenance) in order to perform a query. Depending on the purpose of the query, certain data may be omitted from the results returned to the user. This enhancement allows LInX to maintain its CSP compliance.
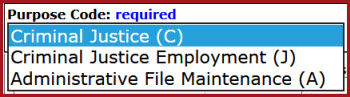
The Purpose Code is required in LInX and will be defaulted to Criminal Justice (C) for all search types, but may be changed, as needed. Purpose Code will remain persistent throughout the current session for any LInX search, unless changed during the session.
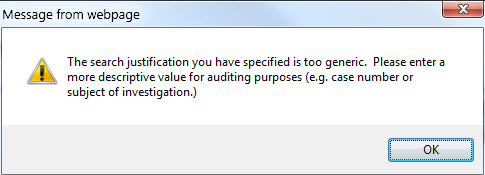
This function allows Tactical and Analytical LInX users the ability to enter the reason a search is being conducted. This field is located at the top of each query screen. The field is automatically highlighted in yellow, contains a hint identifying the type of information that should be included when entering a justification, and is required if one or more agencies in the selected neighborhood require a justification in order to search their data.

If a Purpose Code of Criminal Justice Employment (J) is selected, the system will default the Justification to "Employment". When the Purpose Code is changed to Criminal Justice (C) or Administrative File Maintenance (A), the Justification field is cleared and must be entered/re-entered.
If the justification entered is too generic, a pop-up message will be received advising the user to enter a more descriptive value.
Justification will remain persistent throughout the current session, for any LInX search, unless changed during the session.
Analytical and Tactical LInX users have the ability to save queries, watch saved queries for new information, and load saved queries.
Saved Queries
Queries may be saved directly from the Query screen by clicking on the Save/Watch button, which will display a Save and Watch Query screen.
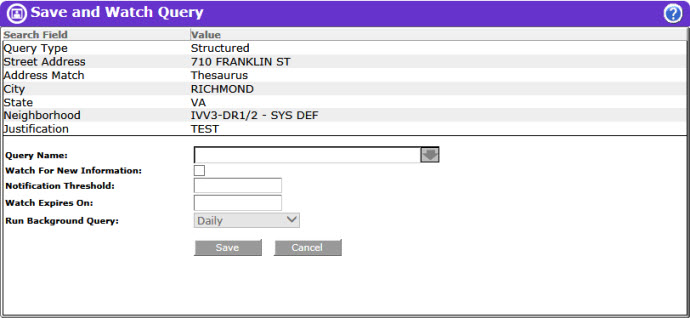
The top portion of the Save/Watch Query screen contains the search parameters and criteria that will be saved.
Enter a name in the Query Name field, and click the Save button. The user is returned to the previous screen and a pop-up message is displayed stating that the query has been saved. Click OK to close the message box. Saved queries may be viewed and managed from My LInX/Manage Watch List.
Clicking the Cancel button will return the user to the previous screen without saving the query.
Watched Queries
Users may also set watches on selected saved queries to monitor for new information, get notifications when new information is available, and view the new information. Watched queries that search other LInX and Partner systems can be created.
To watch an entity, a query must contain at least one of the following sets of criteria:
• First Name + Last Name (with/without Thesaurus)
• SSN
• Misc ID
• Full Name
• Tag Number
• VIN
• Street Address + City + State
• Phone Number Prefix + Suffix
• Property Serial Number
Queries can be configured to be watched directly from the Query screen by clicking on the Save/Watch button, which will display a Save and Watch Query screen.
After entering a name in the Query Name field, click the Watch For New Information check-box in the Save and Watch Query window to select it. The Watch Expires On field is automatically populated with a date 90 days from the current date.
NOTE: The Notification Threshold field identifies the most recent record available in the system for a watched query, and will remain blank when configuring a watch from a Query screen. It is recommended that watches be configured from a Structured Results or Query History screen, so the Notification Threshold can be set. If a query returns no results, a watched query for that search criteria can still be configured from the Query screen.
Next, click the down arrow at the end of the Run Background Query field to select the frequency of the background search (Daily, Every Other Day, or Weekly). The default setting is Daily.
After all the desired settings are configured, click the Save button. The user is returned to the previous screen and a pop-up message is displayed stating that the query has been saved. Click OK to close the message box. Watched queries may be viewed and managed from My LInX/Manage Watch List.
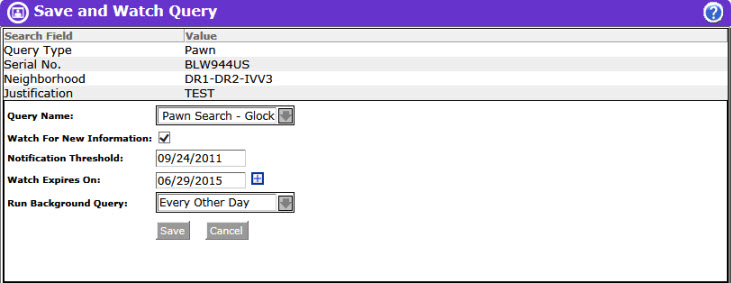
Clicking the Cancel button instead of Save will return the user to the previous screen without saving/watching the query.
Any attempt to watch a query that does not meet the minimum requirements will result in a pop-up message stating ”Query has been saved but does not meet the minimum requirement for a watch query.” The saved query can be viewed under My LInX/Manage Watch List below any watched queries.
When all the information to be used in the query has been entered, and the source of information selected, clicking on the Search button will begin the search process.

The Clear button, located at the bottom of the search screen, will clear all the fields in the query screen, with the exception of the Justification field, without having to leave the query screen.
Load Saved Queries
Users may load any of their saved queries directly from the Query screen by clicking the Load button, which will open a Query Selection menu in a separate window.
To view the search criteria for a saved query, select the radio button next to the desired query name and mouse-over the selected query name for a moment. The LInX system will retrieve the search criteria and display the query details to the user in a pop-up description box.
To load a query, ensure that the radio button for the desired query is selected, and then click the Load button. A pop-up message stating ”Requested query loaded” is displayed. Click the OK button to close the pop-up message.
The query screen is re-displayed and populated with the search criteria from the selected saved query. Click the Search button to run the query.
Clicking the Cancel button from the Query Selection window will close the window and return the user to the Query screen without loading any data.
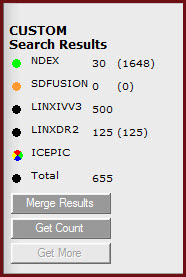
A Results Management Status is displayed beneath the menu bar on the left side of the screen. The Status contains the name of the neighborhood that was searched, the name of each system and/or Partner contained in the neighborhood, and the number of matching records retrieved from each (up to the specified search increment) within the designated time threshold - which begins when the first results are returned.
Search results from one or more remote systems or Partners will automatically be merged and displayed in the LInX search result set, if they are available within the results management time threshold.
If the search of a system has not been completed within the time threshold, a visual indicator will denote the status of that search. The visual indicator status legend is as follows:
Ø Black - The search of the system was successfully completed within the time threshold, and all results have been returned.
Ø Red - An error occurred while attempting to search the system (search timed out).
Ø Green - The search of the system was completed after the time threshold was exceeded. Results from the search are now available and ready to be merged into the current result list.
Ø Multi-colored "beach ball" - Waiting for results, as the search of the system is still in progress.
Hovering the cursor over each visual indicator will display a pop-up containing the status description.
Merge Results
When there are results available to be merged, denoted by a green indicator next to the system name, the additional records can be manually merged into the current results set by clicking on the Merge Results button, which is highlighted to show it is available.

Results before Merge
The visual indicator next to the system name will turn from green to black. The number of records and the date range for the records in the result set summary will update accordingly, to account for the inclusion of the additional records. The Merge Results button will no longer be highlighted.
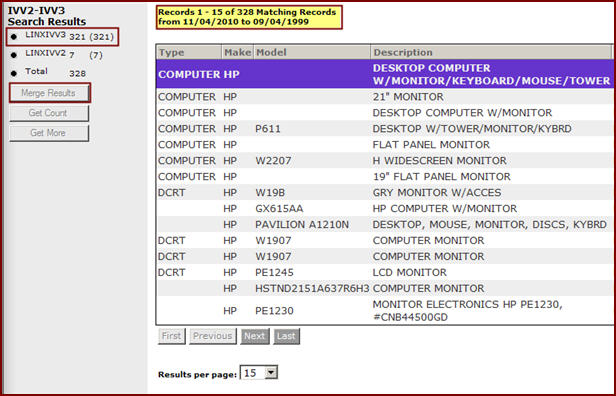
Merged Results
Note: Unless the Merge button is used, all results will not be transferred/moved to the results list. |
Get Count
If the number of records retrieved is greater than the search results increment selected under Set Preferences (e.g., 100, 200, 500, or 1000), the number of records shown equals the increment number. If there are additional records beyond the results increment, the Get Count button will become available. When the Get Count button is selected, the visual indicator for each system will change to the multi-colored ”beach ball” while the counts are being calculated. Once the total record count is returned, the visual indicator will return to its previous state (black or green), and the total number of records from each system that match the search criteria will be displayed in parentheses.
Note: The user selects the size of the batch in Set Preferences under the ”My LInX” menu option located along the left side of the screen.
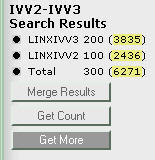
Get More
When the results from a LInX system are returned, and there are still additional matching records available (as defined by the search result increment selected in Set Preferences), the Get More button can be used to obtain the next increment of records that match the search results (e.g., 200), from each system.
When the Get More button is selected, the visual indicator for each system having additional matching results will change to the multi-colored ”beach ball” while the additional records are being retrieved. Once the additional records are available, the visual indicator will change to green, indicating the records are ready to be merged. Each request for more records retrieves an additional set of records (up to the set maximum number) from where the user left off, based on date.
Click on the Merge Results button to include the additional records into the current results list. The Summary above the results list will update to indicate the total number of matching records now in the list, as well as the expanded Incident Date range.
Note: If there are agencies feeding more than one LInX Region (e.g., VSP, VAABC), the data from the local system will be used when these agencies are selected, preventing duplication of data.
Remove Date Range
If the search was limited to the last 2 years (by clicking on the Last 2 years link on the Query screen), the date range limit can be removed, and the query automatically rerun, by clicking on the Remove date range <mm/dd/yyyy> to <mm/dd/yyyy> link, where mm/dd/yyyy represents the month/day/year of the Start Date and the End Date of the Date Range.
Pawn data contained in the data warehouse that meets the search criteria will be returned as a result list. The result list is displayed at the bottom half of the screen, below the Pawn Characteristics tab, and represents the first 200 records that meet the search criteria. (If the user has set the default search increment to 100, 500, or 1000, the result list will contain that number of records).
Information related to the first row of the result list is automatically displayed in the Pawn Characteristics fields at the top of the screen. Unlike other result lists that are person-centric, this list is based on the pawned property items.
The result list appears in descending chronological order, with the most recent Incident Date at the top of the list.
The user can rearrange the order of the result list by clicking on any of the column headings (e.g., Type, Make, Model, etc.).
Hovering the mouse over the Agency ID in the result list will display a pop-up containing the full agency name.
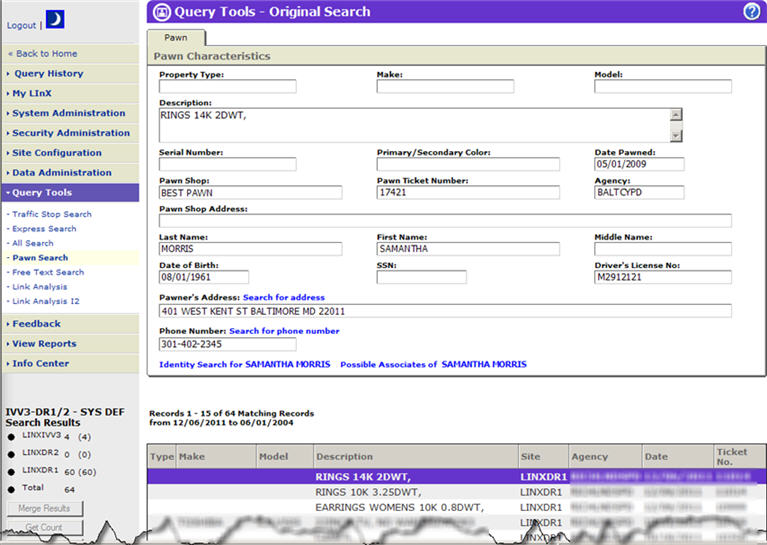
By clicking on other rows in the result list, the information displayed in the Pawn Characteristics fields at the top of the screen will be replaced with information related to the new record selected.
As the user moves through the pages of the result list (using the First, Previous, Next, and Last buttons), the summary will update which records of the total result list are currently being displayed.
![]()
Viewing Records in the Result List
The default columns in the result list includes the following data, if it is available in the database:
Ø Type
Ø Make
Ø Model
Ø Description
Ø Site (mouse-over displays full site name)
Ø Agency Abbreviation (mouse-over displays full agency name)
Ø Incident Date
Ø Ticket Number
The Search for address capability enables a LInX user to run a query for a selected pawner's address directly from the search results screen without having to return to the query screen. Pawn Shop addresses will not be searched.
A Search for address link is dynamically created next to the Pawner's Address label above the Address field on the Pawn tab, if the Pawner's Address field is populated. There will be no search link if the Pawner's Address field is not populated. If there are multiple addresses available for the selected pawner, the link will display as Search for selected address, and the drop-down list can be used to access other addresses to search.
Clicking the Search for [selected] address link will display a new result list of records that contain the address that was searched. While the search is being performed, a notation of "Searching Address" may be seen above the Pawner's Address field, highlighted in yellow.
Rules for searching an address:
For the Local site, the Street Name is required to perform the search
For a Remote site, the following information is required: Street Address OR Street Name, and either a City and State, OR a Zip.
To return to the original search results, click on the Return to Original Search Results link at the bottom of the Pawn tab.
Tip: Use Query History as a reminder of the address(es) that were searched if multiple Address Searches were made. |
The Search for phone number capability enables a LInX user to run a query for a selected phone number directly from the search results screen without having to return to the query screen.
A Search for phone number link is dynamically created next to the Phone Number label above the Phone Number field on the Pawn tab, if the Phone Number field is populated. There will be no search link if the Phone Number field is not populated. If there are multiple phone numbers available for the selected person, the link will display as Search for selected phone number, and the drop-down list can be used to access other phone numbers to search.
Clicking the Search for [selected] phone number link will display a new result list of records that contain the phone number that was searched. While the search is being performed, a notation of "Searching Phone Number" may be seen above the Phone Number field, highlighted in yellow.
Rules for searching a phone number:
For the Local site, the prefix and suffix are both required
For a Remote site, area code, prefix, and suffix are all required
To return to the original search results, click on the Return to Original Search Results link at the bottom of the People tab.
Tip: Use Query History as a reminder of the phone number(s) that were searched if multiple Phone Searches were made. |
The Person Identity capability enables a LInX user to run a query for a selected person directly from the search results screen without having to return to the query screen.
An Identity Search link containing the person’s name is dynamically created at the bottom of the Pawn tab of the selected pawner. Clicking the link will display a new result list of people with the same name and DOB as the selected pawner. While the search is being performed, a notation of "Searching Identity" may be seen at the bottom of the Pawn tab, highlighted in yellow.
The identity search algorithm is based on the following criteria:
First Name + Last Name + DOB (using Thesaurus) OR
1st Character of First Name + 1st 3 Characters of Last Name + DOB + Sex OR
SSN OR
FBI Number
If there is not enough information for the selected person to be uniquely identified, a pop-up window will be displayed stating, ”Insufficient data available!”.
To return to the original search results, click on the Return to Original Search Results link below the People tab.
An Identity Search query can be saved/watched in the same manner as other search queries (see Save and Watch Selected Queries section below).
Tip: Use Query History as a reminder of the name(s) that were searched if multiple Identity Searches were made. |
The Possible Associates capability allows a user to search for and view all persons associated with the selected person in a search result list. The user may recursively select possible associates of possible associates.
A Possible Associates link containing the person’s name is dynamically created at the bottom of the Pawn tab of the selected pawner. Clicking the link will display a new result list of all people who were involved in any incident involving a person with the same name and identifiers as the selected person.
While the search is being performed, a notation of "Searching Possible Associates" may be seen at the bottom of the Pawn tab, highlighted in yellow.
If there is either not enough information for the selected person to identify incidents involving the selected person, or there are no other records that involve the selected person, a pop-up window will be displayed stating ”No possible associates found!”.
To return to the original search results, click on the Return to Original Search Results link at the bottom of the People tab.
Tip: Use Query History as a reminder of the name(s) that were searched if multiple Possible Associates searches were made. |
At the bottom of each page of result records, there are several buttons which allow the user to navigate the current result list of records returned, as well as getting the next (or previous) result set, as depicted below:
In addition, there is a Results per page drop-down box, that allows the user to select how many results should be shown on a page before having to move to the next page. One of the options is to show all returned results on one page. If All is selected, the navigation buttons will be gray-out and not available.
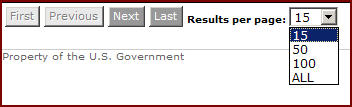
The use may also set a default results per page by selecting and saving the desired option under My LInX/Set Preferences. This default can be overridden at any time by using the drop-down box shown above.
SAVE/WATCH A Query
The process of saving and setting watches from the Pawn Search results page is the same as from the Query page (described above, under Save and Watch Selected Queries), except that the Notification Threshold will automatically be populated with the date of the most recent record returned in response to the search when a query is configured to be watched in the Save/Watch Query window.
NOTE: When search results from a Person ID, Possible Associates, or Address/Phone Quick link search are saved/watched, it is only the search criteria from the ORIGINAL search results that are saved, not the results from subsequent link searches.
Initiating a New Query
A new query can be initiated by selecting the New Query button at the bottom of the result list, which will present a blank Pawn Search screen. If the Revise Query button is selected, the Pawn Search screen will reappear with the search criteria that was used for the last search, which can then be modified to create a new search.

Tactical and Analytical users should contact their System Administrator or Agency Administrator when they are having problems accessing or using LInX. Only System Administrators are authorized to contact the LInX Help Desk.