To have access to the Free Text Search screen, the user must have been assigned an Analytical role in LInX.
Restrictions on the Use of LInX Data
|
The data from the LInX system is not considered and should not be used for original documentation for probable cause from any participating agency. Use of the data is controlled by the LInX Rules of Operation for each regional LInX system. Contact you system administrator for a copy. |
Search Process
The search process is designed to produce these results:
Ø A search of text terms will bring back a list of matches from narratives in the warehouse.
Ø The default source for the results is all agencies, meaning that the search includes all data in the data warehouse from all sources.
Ø By selecting one or more source agencies (using Neighborhood Selection) for the search process rather than all agencies, the results will be filtered to reflect only the data from the selected sources.
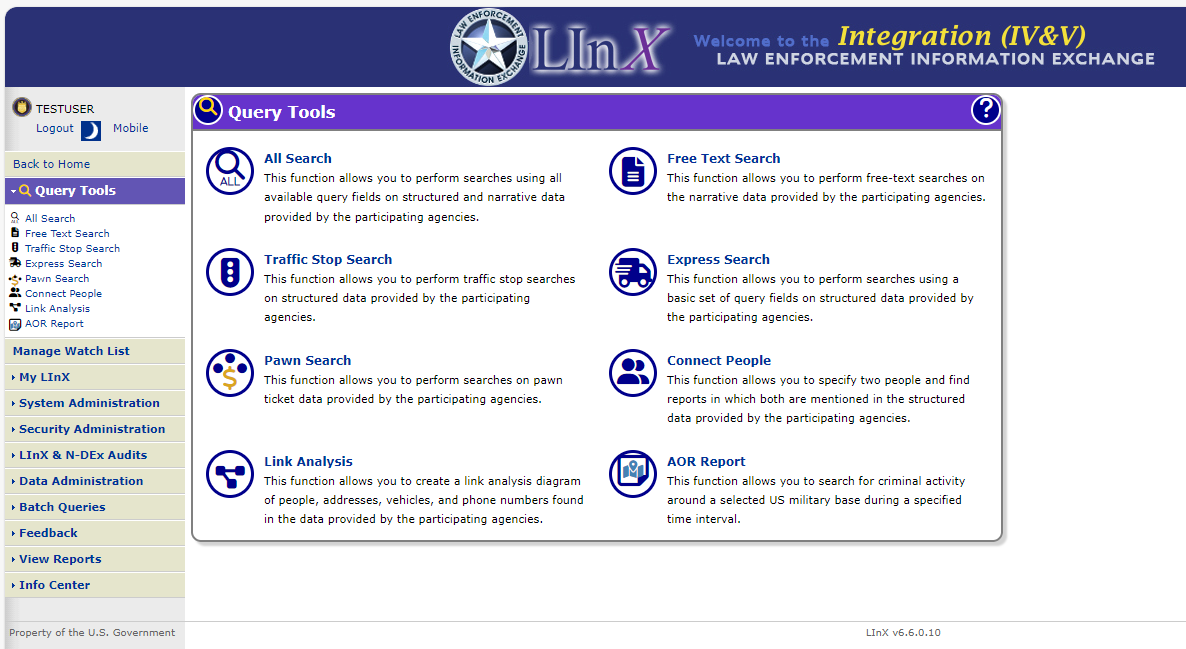
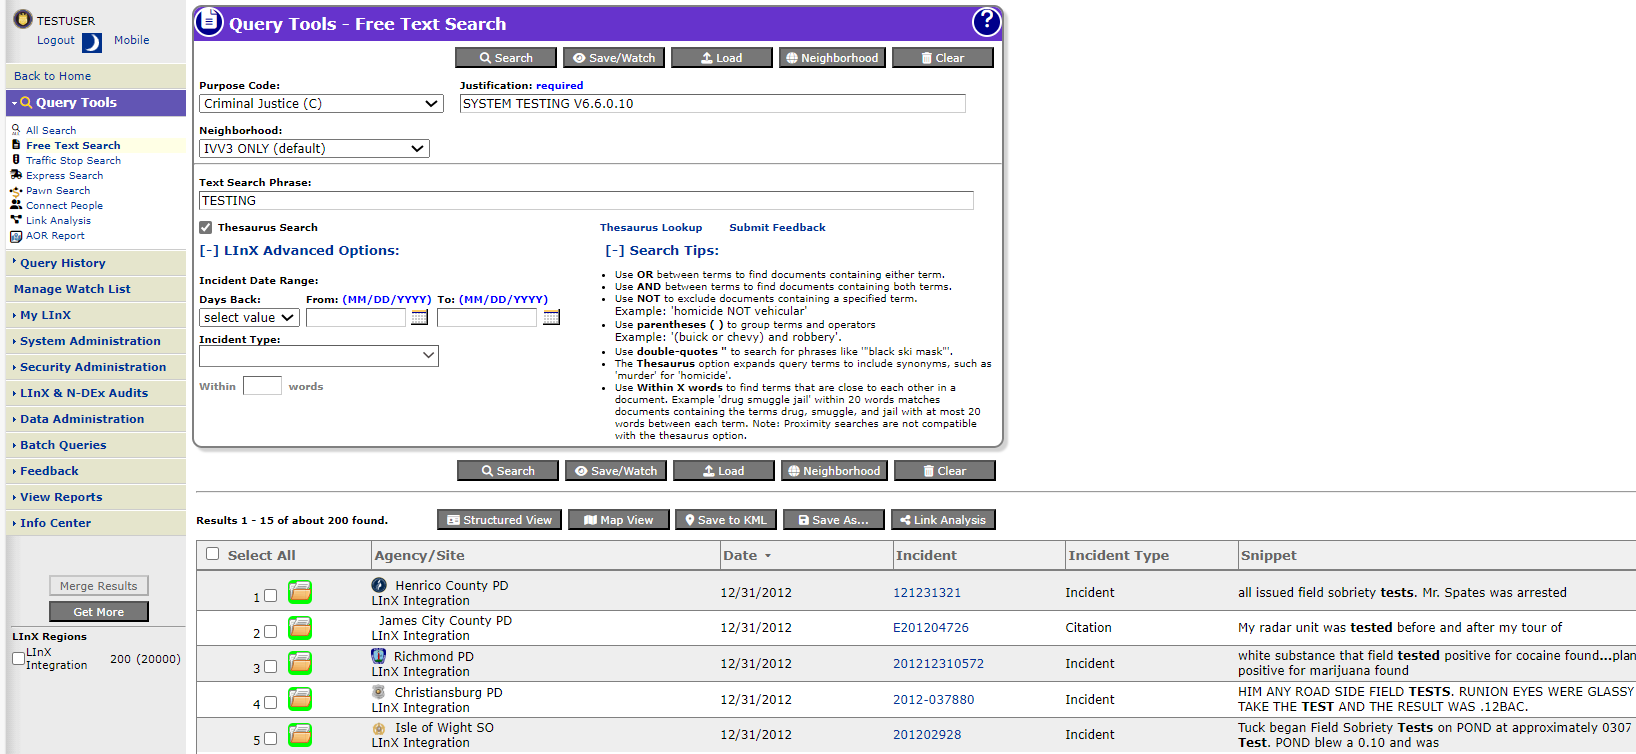
Analytical LInX users can access the Free Text Search screen either from the Query Tools title page, or from the menu bar located along the left side of the screen. The Free Text Search screen allows the Analytical user to search investigative record documents that have been placed in the LInX data warehouse as whole documents. Sometimes called unstructured documents because they are incorporated whole into the data warehouse, these documents can be text files, word processing documents, or PDF files; but they cannot be scanned documents.
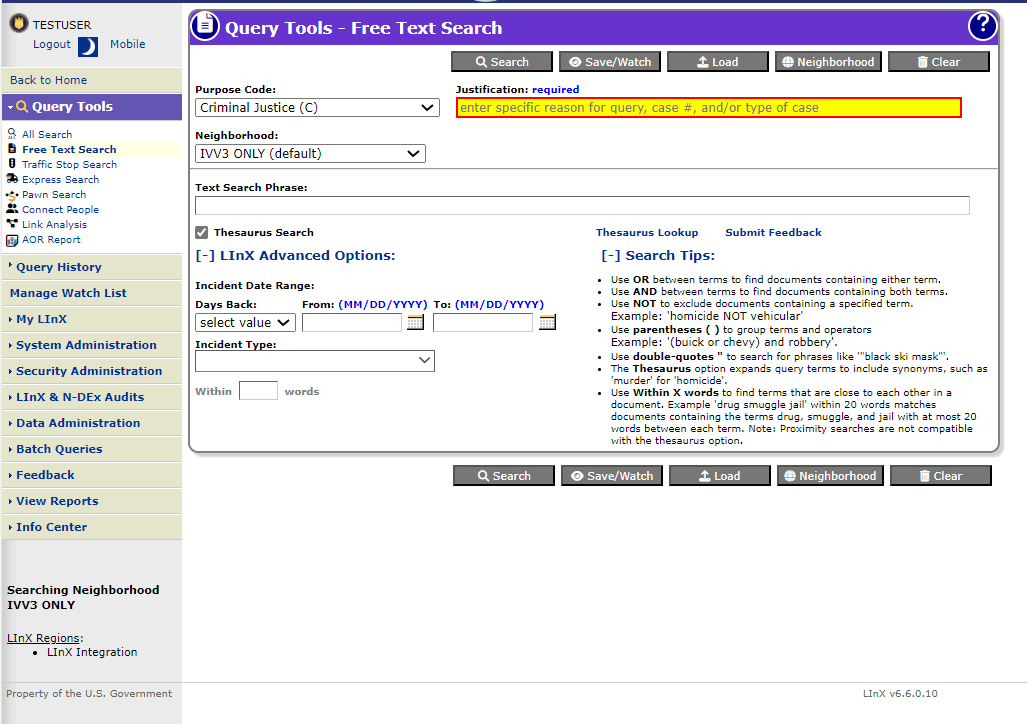
The Free Text Search page allows users to enter search criteria that can be used to generate search results. This page also provides the capability to Save/Watch and Load search queries.
The criteria to be used for a Free Text Search should be entered into the text field on the screen. Clicking on the Search button will initiate the query.
The search can be further refined by providing a date range and/or specifying within how many words of each other the words of a phrase should appear in a document in order to meet the search criteria.
The following fields are used as the search criteria for Free Text Search:
Ø Purpose Code (defaulted to Criminal Justice (C))
Ø Justification (highlighted in yellow if required)
Ø Text Search Phrase
Ø Thesaurus Search [check-box]
Ø Map Selection
Ø Neighborhood (drop-down selector)
Ø Incident Date Range From: (mm/dd/yyyy)
Ø Incident Date Range To: (mm/dd/yyyy)
Ø Within "#" words (proximity of words in search phrase to each other)
Examples of information that can be entered into the Text Search Phrase field and searched include:
Ø Names
Ø Addresses (placing the Boolean operator "AND" between the number and street name will improve the results)
Ø Weapons
Ø Phone Numbers
Ø Vehicle information (e.g., License Plate, VIN)
Ø Organizations
Ø Phrases (such as ”bomb threat”)
Exact and thesaurus Search Options
There are two different levels of complexity available for users to conduct free-text searches. The options available are:
Exact Search: limits the search results to those records that are an exact match to the search criteria. Results will only be returned if they meet all the criteria entered in the various search characteristics categories. Results will be returned for exact spelling or numerical matches.
Exact Searches may be conducted for Name, Address, or Text queries.
An Exact Search will be conducted unless the Thesaurus Search check-box is checked.
Thesaurus Search: uses a static LInX thesaurus index to expand the search results to include structured records that contain terms that are grouped together according to similarity of meaning to the search term(s), in addition to those records that contain exact matching terms to the search criteria. Results will be returned for exact spelling or numerical matches, and related terms.
Thesaurus Searches may be conducted for Name, Address, or Text queries.
Examples of Thesaurus entries using the Person Full Name index include:
William - Will, Willie, Bill, Billy
Steven - Stephen, Steve, Steph
Kenneth - Ken, Kenny
Examples of Thesaurus entries using the Full Street Address index include:
Street - St, Str, Strt
Road - Rd
Avenue - Av, Ave
1st - First
Examples of Thesaurus entries using the Narrative index include:
Murder - Homicide, Manslaughter
Cocaine - candycaine, coke
Thesaurus Lookup
The Thesaurus Lookup feature enables a user to enter a term, and find associated synonyms for that term in the LInX thesaurus.
.jpg)
To use the Thesaurus Lookup, click on the Thesaurus Lookup link. This opens a lookup window. Enter the term in the text box, and click on the Look Up button. If there are synonyms for the term entered, they will be displayed in the scroll box beneath the text box. Click the Close button to close the lookup window.
If no synonyms are found for the term entered, or there are additional synonyms for the term that are not included in the Lookup table, clicking on the Submit Feedback link will take the user to the Thesaurus Feedback screen, where suggestions for new terms and/or synonyms for existing terms in the LInX Thesaurus can be submitted for consideration.
To conduct thesaurus searches, click the Thesaurus Search check-box below the Text Search Phrase field to select the option.
.jpg)
Note: The word proximity range (Within "#" words) is not available (grayed out) when the Thesaurus Search option is being used.
The Exact and Thesaurus search options may be selected within the Free-Text Search query screen. The desired default search type can also be set by the user on the Set Preferences screen, under My LInX.
Using Boolean Operators
The order in which search criteria are entered does not affect the search results. However, criteria can be refined by using the logical search operators of ”AND,” ”OR,” and ”AND NOT” as well as parentheses (Boolean search):
|
Boolean Operator |
Result |
|
AND |
Results containing both search terms will be returned. The AND operator is automatically implied if multiple words are entered without other operators. |
|
OR |
Results containing either of the search terms will be returned. |
|
AND NOT |
Eliminates results containing the term after "NOT" (such as "cat AND NOT dog"). |
|
( ) |
Allows search of terms nesting in parentheses, such as "cat AND (dog OR bird)". Will return results that contain dog and/or bird, as long as the document contains cat as well. |
Free Text Search Tips
Ø Tip: Terms can be grouped by using parenthesis for more control. For example, to search narratives that contain either MURDER AND GUN or MURDER AND KNIFE, enter: MURDER AND (GUN OR KNIFE).
Ø Tip: Many words will automatically match plural and other forms of words: e.g., SCHOOLED will match SCHOOL, SCHOOLS, and SCHOOLED.
Ø Tip: When certain search terms are entered, a concept match is done automatically. e.g., MURDER will match MURDER, HOMICIDE, and KILL.
Ø Tip: The wild card " %" can be used to match zero or more characters and the wildcard " _" can be used to match exactly one character; e.g., GU% will match GUN, GUM, GUS, GUSTERSON etc., while GU_ will only match GUN, GUM, GUS, etc.
Ø Tip: Note that commonly used words such as "AN", "A", "THE" are ignored in all searches.
Ø Tip: For agency selection, click ”(Change Neighborhood...)” or the Neighborhood button to select the agencies/sites/Partner system(s) to be searched. All, some, or any one agency’s data can be searched. Only agencies that provide narrative data will be in the pick list (see Neighborhood Selection section, below).
Ø Tip: A range of dates can be entered to limit the search. The date format must be in MM/DD/YYYY format. The calendar control may also be used to enter dates.
Search only last 2 years of data
An initial query may be limited to search data for the most recent 2 years, by clicking on the Last 2 years hyperlink next to the Incident Date Range on the Query screen. Selecting this option will automatically pre-populate the Date Range fields, extending back 2 years from the current system date.
When the Date Range fields are pre-populated to search the last 2 years of data, clicking on the Clear hyperlink will remove the limitation, and allow searching of older data.

![]()
Note: if the Date Range is manually entered, the Last 2 years link will remain and the Clear link will not be displayed.
The default Free Text Search setting is to search the designated default neighborhood, as defined by the regional system administrator. Typically this would include all local contributing agencies; meaning that the search includes all data in the data warehouse from all local sources.
The Neighborhood drop-down selector allows a user to access and select other existing System Defined and User Defined neighborhoods.
To select an existing neighborhood from the Neighborhood drop-down menu, just click on the desired neighborhood. The neighborhood field will automatically update with the name of the selected neighborhood.
The Neighborhood button allows a user to access the Neighborhood Selection menu and select one or more agencies, sites, and/or Partner systems against which to conduct a search. The results will be filtered to reflect only the data from the selected source(s) when the user limits the search to one or more source agencies, rather than all agencies.

Selecting a Neighborhood:
When the Neighborhood button is selected, the Neighborhood Selection menu and a description of the screen functionality are displayed. Additional help for Neighborhood Selection can be found within the Neighborhood Selection functionality by clicking on the Online Help button [ ] located in the upper right-hand corner of the Neighborhood Selection screen.
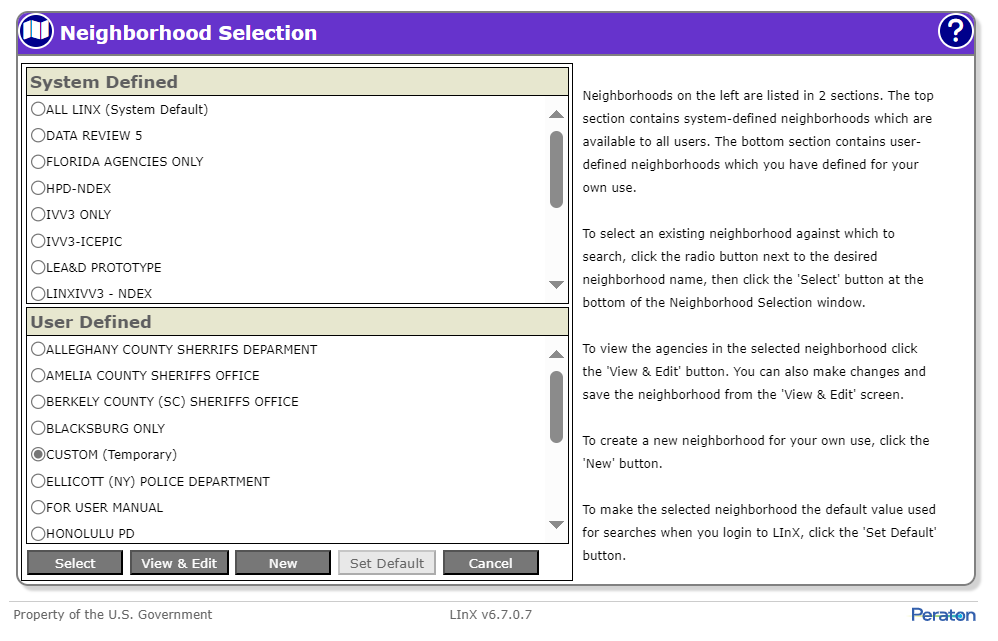
Selection Status:
The text appearing on the Query Tools - Free Text Search banner provides the user with the selection status. If there are no neighborhoods listed, or no neighborhood has been identified as the ”default” neighborhood, the local agencies of the current LInX system, plus whichever remote system(s) that may be included as a default by the Regional Administrator, will be the default agency source criteria for all searches.

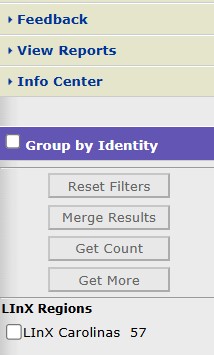
In addition to the banner, a LInX Regions section appears on the left below the navigation menu, also provides the user with the neighborhood selection(s). If there are no neighborhoods listed, or no neighborhood has been identified as the ”default” neighborhood, the local agencies of the current LInX system, plus whichever remote system(s) that may be included as a default by the Regional Administrator, will be the default agency source criteria for all searches.
When a different neighborhood selection is made, the selection status changes to reflect the name of the newly-selected neighborhood.
A Purpose Code is required for transactions within the FBI's National Data Exchange (N-DEx) system, ensuring authorized use for sharing criminal justice data across jurisdictions. The Purpose Code (e.g., Criminal Justice, Criminal Justice Employment, or Administrative File Maintenance) should be chosen depending on the purpose of the query. Certain data may be omitted from the search results returned to the user with employment or administrative searches. This allows LInX to maintain its CSP compliance.
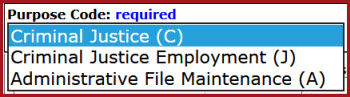
The Purpose Code is required for LInX searches and will be defaulted to Criminal Justice (C) for all search types, but may be changed, as needed. Purpose Code will remain persistent throughout the current session for any LInX search, unless changed during the session.
This function allows Tactical and Analytical LInX users the ability to enter the reason a search is being conducted. This field is located at the top of each query screen. The field is automatically highlighted in yellow, contains a hint identifying the type of information that should be included when entering a justification, and is required if one or more agencies in the selected neighborhood require a justification in order to search their data.

If a Purpose Code of Criminal Justice Employment (J) is selected, the system will default the Justification to "Employment". When the Purpose Code is changed to Criminal Justice (C) or Administrative File Maintenance (A), the Justification field is cleared and must be entered/re-entered.
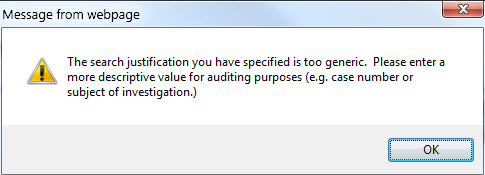
If the justification entered is too generic, a pop-up message will be received advising the user to enter a more descriptive value.
Justification will remain persistent throughout the current session, for any LInX search, unless changed during the session.
Analytical and Tactical LInX users have the ability to save queries, watch saved queries for new information, and load saved queries.
Saved Queries
Queries may be saved directly from the Query screen by clicking on the Save/Watch button, which will display a Save and Watch Query screen.
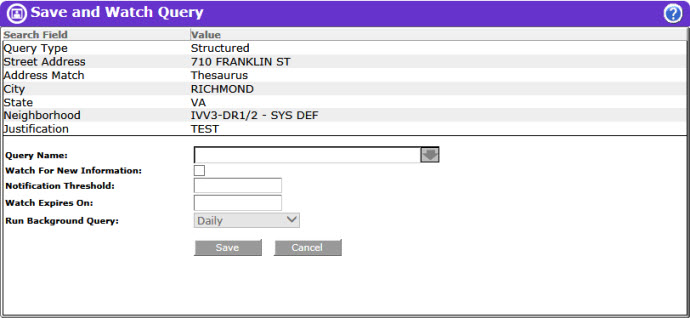
The top portion of the Save and Watch Query screen contains the search parameters and criteria that will be saved.
Enter a name in the Query Name field, and click the Save button. The user is returned to the previous screen and a pop-up message is displayed stating that the query has been saved. Click OK to close the message box. Saved queries may be viewed and managed from My LInX/Manage Watch List.
Clicking the Cancel button will return the user to the previous screen without saving the query.
Watched Queries
Users may also set watches on selected saved queries to monitor for new information, get notifications when new information is available, and view the new information. Watched queries that search other LInX and Partner systems can be created.
To watch an entity, a query must contain at least one of the following sets of criteria:
• First Name + Last Name (with/without Thesaurus)
• SSN
• Misc ID
• Full Name
• Occupation
• Tag Number
• VIN
• Street Address + City + State
• Phone Number Prefix + Suffix
• Property Serial Number
Queries can be configured to be watched directly from the Query screen without first running the query by clicking on the Save/Watch button, which will display a Save and Watch Query screen.
After entering a name in the Query Name field, click the Watch For New Information check-box in the Save and Watch Query window to select it. The Watch Expires On field is automatically populated with a date 90 days from the current date.
NOTE: The Notification Threshold field identifies the most recent record available in the system for a watched query, and will remain blank when configuring a watch from a Query screen. It is recommended that watches be configured from a Structured Results or Query History screen, so the Notification Threshold can be set. If a query returns no results, a watched query for that search criteria can still be configured from the Query screen.
Next, click the down arrow at the end of the Run Background Query field to select the frequency of the background search (Daily, Every Other Day, or Weekly). The default setting is Daily.
After all the desired settings are configured, click the Save button. The user is returned to the previous screen and a pop-up message is displayed stating that the query has been saved. Click OK to close the message box. Watched queries may be viewed and managed from My LInX/Manage Watch List.
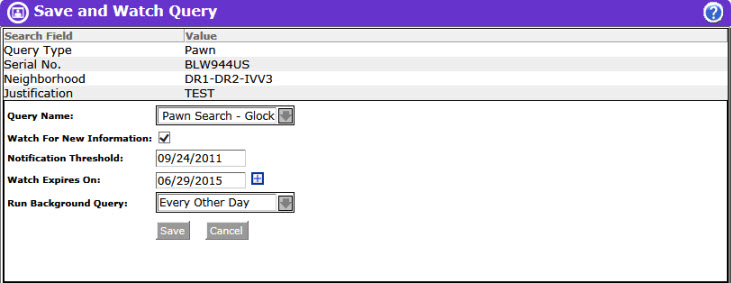
Clicking the Cancel button instead of Save will return the user to the previous screen without saving/watching the query.
Any attempt to watch a query that does not meet the minimum requirements will result in a pop-up message stating ”Query has been saved but does not meet the minimum requirement for a watch query.” The saved query can be viewed under My LInX/Manage Watch List below any watched queries.
When all the information to be used in the query has been entered, and the source of information selected, clicking on the Search button will begin the search process.

The Clear button, located at the bottom of the search screen, will clear all the fields in the query screen, with the exception of the Justification field, without having to leave the query screen.
At the bottom of each page of result records, there are several buttons which allow the user to navigate the current result list of records returned, as well as getting the next (or previous) result set, as depicted below.
In addition, there is a Results per page drop-down box, that allows the user to select how many results should be shown on a page before having to move to the next page. One of the options is to show all returned results on one page. If All is selected, the navigation buttons will be gray-out and not available.
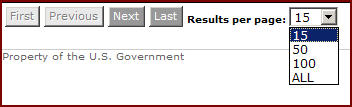
The use may also set a default results per page by selecting and saving the desired option under My LInX/Set Preferences. This default can be overridden at any time by using the drop-down box shown above.
When the query has been executed, the Free Text Search query screen will reappear with a list of documents that meet the search criteria. The result list will identify the Site Name, Incident Date, Document Number, Agency ID, and a short snippet of the document containing the search criteria.
The full document can be viewed by clicking on the Document Number link in the result list.

An example of a Free Text document is shown below:
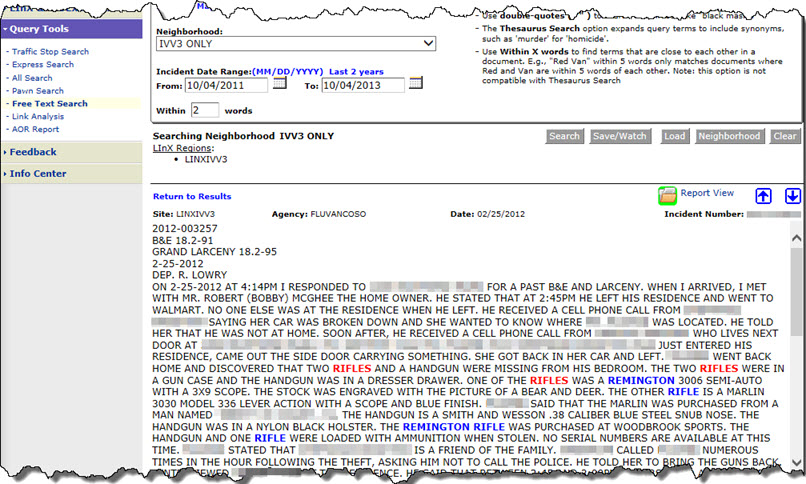
Exact matches appear in blue text. Like terms appear in red type.
The Up and Down navigation arrows [.jpg) ] can be used to move from one document view to another without returning to the search results. Selecting the Return to Results link returns the user to the original results list.
] can be used to move from one document view to another without returning to the search results. Selecting the Return to Results link returns the user to the original results list.
To begin a new Free Text Search at any time, the search criteria can be entered into the text field at the top of the screen and the Search button selected to initiate another search process.
If the user is reading the document for a specified time (set by the System Administrator), the system will assume that there is no system activity and the user will automatically be logged off.
Return to Structured Results:
If View Free Text Results has been selected from the results of an All Search structured query (see the All Search help topic for additional details), the Free Text Search screen will include a Return to Structured Results link, located in the middle of the screen, below the query section, to return the user to the original structured search results.

Note: The search criteria that was used in the original All Search structured query is also displayed in the Text Search Phrase field of the Free Text Search query screen.
The user may also open an Event Report for any document returned by either clicking the Report View folder icon [ ] above the Incident Number in the View Document mode, or the same icon in front of each row of the main result list.
If the associated Event Report has not been accessed, the folder icon is highlighted in green [ ]. If the associated Event Report has been accessed, the folder is not highlighted [].
Note 1: An Event Report will continue to display as having been accessed for as long as it remains in the browser history.
Note 2: Color-blindness shading of the Report View icon will appear different between Event Reports that have been accessed and those that have not.
The Event Report is displayed in a separate window, and contains Incident, Warrant, Person, Vehicle, Phone, Property, Weapon, and Narrative information, as applicable, associated with the selected event. The Narrative section, located at the bottom of the Event Report, contains the contents of the document.
In all cases, exact matches will appear in blue text. Like terms (e.g., "kill" for search on "murder"), will appear in red type if the Thesaurus Search option was used.
Links are provided beneath the Event characteristics section of the report which allows the user to navigate easily to the following report sections:
Ø Warrant
Ø People
Ø Vehicles
Ø Phones
Ø Property
Ø Weapons
Ø Narrative
Ø Agency Contact
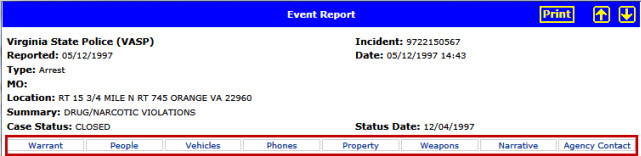
Each section of the Event Report contains a Back to Top link in the lower right-hand corner. Selecting this link will navigate the user back to the top of the report.
To return to the search result list, select the Close button located at the bottom of the Event Report dialog box.
Printing the Event Report
For sites that allow printing, open the desired Event Report by clicking on the Report View icon at the front of the selected record. A Print button is located at both the top and bottom of the Event Report screen. Click either Print button. If the Printing from LInX user agreement has not been accepted, the user agreement will be presented to the user. If the user selects I Do Not Agree, a pop-up window is displayed stating ”You need to accept the Printing From LInX agreement.” Click OK to close the window.
Note: The Print button is not available on Event Reports for any site that does not allow printing.
Once the Printing from LInX user agreement has been accepted, a separate PDF window opens, containing the selected Event Report. The banner at the top of each page displays the following information:
Name of the LInX user requesting the printout
The LInX User ID of the user requesting the printout
The Site, System, and Agency to which the user belongs
The date and time the printed/saved report is to be destroyed
A statement that the printout is for temporary use only.
The bottom of each page displays the following information:
Disclaimer describing the Rules of Use for saving and/or printing the Event Report from LInX
LInX version number
Page number and total number of pages
Date and Time the Event Report was requested to be printed/saved.
To print the Event Report, click on the printer icon [ ] at the top of the PDF window to open a Print window, and click OK to print the report. The PDF window can be closed after the report has been printed.
To save the Event Report, click on the disk icon [ ] at the top of the PDF window to open a Save a Copy window, enter a file name, and click Save to save the report. The PDF window can be closed after the file has been saved.
|
Printed or saved output is for temporary use only; it must be destroyed within 72 hours of being obtained. |
Printing Photos
The photos included with an Event Report can be printed in LInX. If there is only one photo associated with a person, it can only be printed when the Event Report is printed. If there are additional photos associated with a person, click on the More Images link under the image. This will open the photos in a separate window.
To print photos, click the Print button in the lower right-hand corner. If the Printing from LInX user agreement has not been accepted, the user agreement will be presented to the user. If the user selects I Do Not Agree, a pop-up window is displayed stating "You need to accept the Printing From LInX agreement.” Click OK to close the window.
Once the Printing from LInX user agreement has been accepted, a separate PDF window opens, containing all the photos (one photo per page) associated with the event. The banner at the top of each page displays the following information:
Name of the LInX user requesting the printout
The LInX User ID of the user requesting the printout
The Site, System, and Agency to which the user belongs
The date and time the printed/saved photos are to be destroyed
A statement that the printout is for temporary use only
The bottom of each page displays the following information:
Disclaimer describing the Rules of Use for saving and/or printing photos from LInX
LInX version number
Page number and total number of pages
Date and Time the photos were requested to be printed/saved.
To print the photos, click on the printer icon [] at the top of the PDF window to open a Print window, and click OK to print the photos. The PDF window can be closed after all photos have been printed.
To save the photos, click on the disk icon [] at the top of the PDF window to open a Save a Copy window, enter a file name, and click Save to save the photos. The PDF window can be closed after the file has been saved.
|
Printed or saved output is for temporary use only; it must be destroyed within 72 hours of being obtained. |
The Structured View feature provides the capability to select and view free text search results as structured results via a Structured View button on the free text search results screen. If no specific results are selected, the assumption is that all results are to be moved; therefore, no pop-up alert will be presented to the user to make a selection. Incident and person information from records with matching documents will be displayed in the structured result table.
Select the results to be viewed as structured results by checking the boxes in front of each desired item, then click the Structured View button. The results will be transferred to the structured search result screen.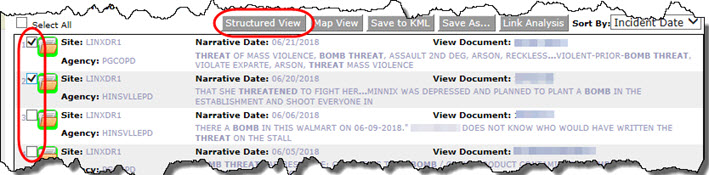
If either no specific results are selected, or the Select All box is checked, all results will be transferred.
A notation above the structured search result table indicates when free text results are included in the result table.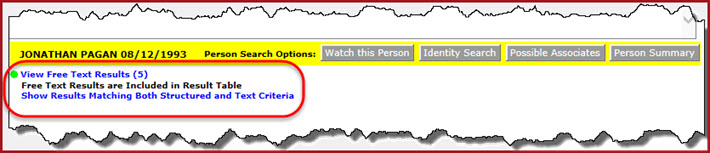
The user can return to the free text search results by clicking on the View Free Text Results hyperlink.
The Save to KML (Keyhole Markup Language) feature is available to Analytical users only, and is subject to configurable site policies. The KML Export Agreement must be accepted by the user in order to access this feature.
One or more results may be selected from a Free Text Search query, and exported to KML. The "Save to KML" button located in the middle of the screen, above the results list, allows a user to export information, including address data, associated with the current search results.
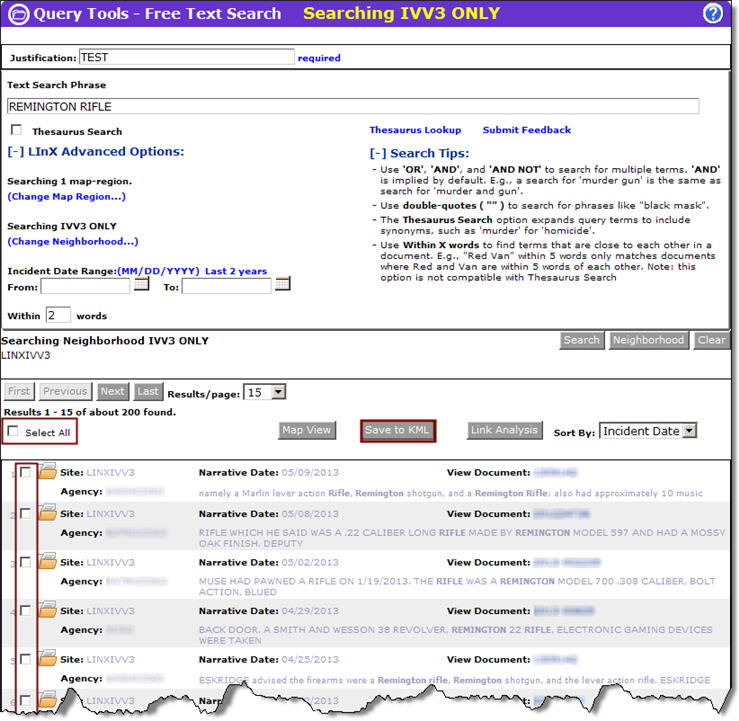
The addresses are exported as a compressed KML file. The KML file contains incident and person information associated with each address, as appropriate. A user can choose to save the file or open it in any earth-viewer application that supports the KML format (e.g., Google Earth). By using a KML-compatible application, the LInX-generated KML file can be opened and the mappable LInX results can be viewed.
Note: LInX does not provide any third-party earth viewing applications; only the ability to export the data to such applications.
Warning: KML data derived from LInX shall only be utilized for official law enforcement agency purposes. Any pertinent information obtained from this file must be verified with the contributing agency. It is possible that the contents of this file have been changed since its generation.
|
Access to the KML feature is only available on LInX systems that receive authorization from the applicable Regional Board of Governance; therefore, this feature may not be available at all LInX sites. |
Analytical LInX users may select one or more results from any structured search (Traffic Stop, Express, All Search), or Free Text Search, and view the selected results in the user’s default Link Analysis tool (I2 or SVG - selected in My LInX/Set Preferences). Link Analysis I2 is the system default if no user preference has been chosen.
Tactical-only user do not have access to this feature.
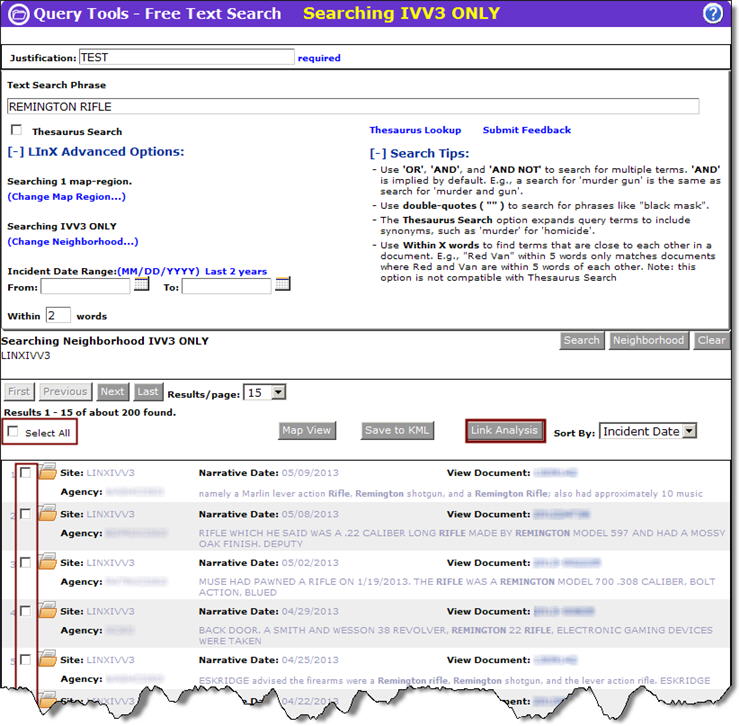
The original search criteria are copied to the Link Analysis Query tab, and the Person and Incident results are then displayed in the Link Analysis Chart and node Table tabs.
Any results moved to Link Analysis can be walked or otherwise manipulated, revised and re-queried in Link Analysis.
Analytical LInX users may select one or more Free Text Search results and export those results to a CSV (comma-separated values) file, flat file (e.g., Notepad), a Microsoft Access® database file, or to a NIEM XML file (with or without mug shots). Users must assign a name to the export for future reference. Tactical-only users do not have access to this feature.
After selecting the desired records from the results list to export, click on the Save As button located in the middle of the screen, above the results list. A pop-up selection box is displayed containing the format types to which the selected results can be exported, along with a field to name the export to be saved.
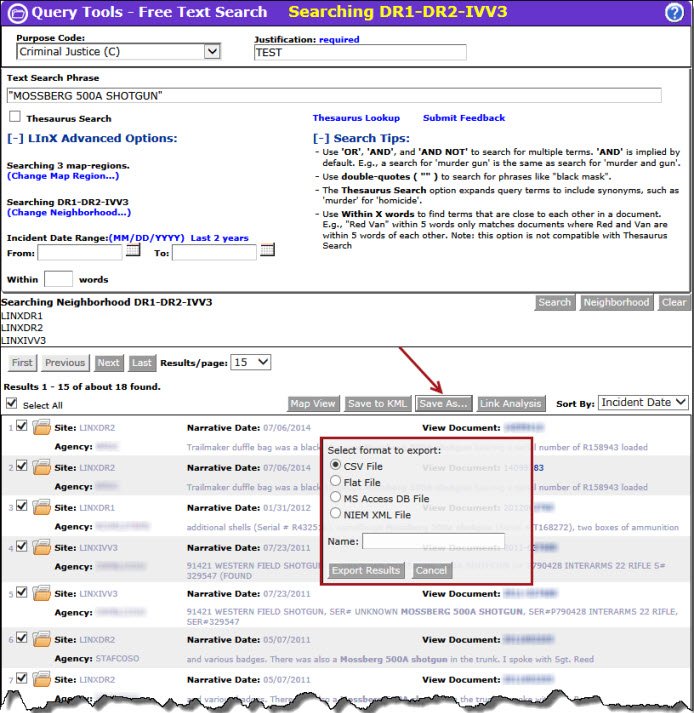
Click the radio button next to the desired export format, then click the Export Results button. If no name is provided, the user will be prompted to enter a download file name.
If results from a site that does not allow downloads are included in the selection, a pop-up message will be presented to the user stating "The following site does not allow download as a matter of policy: <site name>. Information from that site will not be downloaded." Click OK to close the pop-up message. The remaining results will still be downloaded.
Clicking the Export Results button will open a dialog box with the option to Open, Save, or Cancel the action.
The Open button opens the selected format in the default program for that format type.
The Save button offers options to Save, Save As, or Save and Open the download.
Ø Save will save the export in the user's default download folder.
Ø Save As opens a Save As window, where the user can rename the download, as well as specify the location where the download is to be stored.
Ø Save and Open will save the download to the user's default download folder, and also open the download in the default program for that format type.
The Cancel button will return the user to the free-text search results screen without saving any results.
The CSV File opens in a Microsoft Excel® spreadsheet window containing the data that was exported. The first line of the spreadsheet contains the column headings for a pre-determined, limited set of fields that have been exported.
When Save is selected, the file will be saved as a CSV (.csv) file in the default or designated folder.
When Flat File is selected, the user can choose a field delimiter from the following available options:
Comma (,)
Pipe (|)
Semicolon (;)
Tab
The Flat File opens in a Notepad window containing the data that was exported. The first line of the flat file contains the column headings for a pre-determined, limited set of fields that have been exported.
When Save is selected, the file will be saved as a text (.txt) document in the default or designated folder.
Selecting MS Access DB File opens the Microsoft Access® database application which displays a list of tables that contain the data that was exported.
When Save is selected, the download will be saved as an Access Database (.mdb) file in the default or designated folder.
When NIEM XML File is selected, the user can choose to export the results with or without mug shots. The NIEM XML File opens a window containing the selected data in XML format, via the user's default program for opening files of that type.
When Save is selected, the file will be saved as an XML (.xml) file in the default or designated folder.
Tactical and Analytical users should contact their System Administrator or Agency Administrator when they are having problems accessing or using LInX. Only System Administrators are authorized to contact the LInX Help Desk.