This capability allows users to create areas of interest (Neighborhoods) against which to search, that can be comprised of a set of local and/or remote agencies.
There are two types of neighborhoods: System Defined and User Defined. System Defined Neighborhoods are those neighborhoods created by a Regional Administrator and designated for access by all users of that LInX system. Only a Regional Administrator can edit or delete a System Neighborhood.
A User Defined neighborhood can be a new neighborhood created by a LInX user, or an existing neighborhood that has been customized and saved either under the same or a different name by a LInX user. A User Defined neighborhood is only available to the user that created it.
The search results from query screens will be filtered to reflect only the data from the selected source(s) when the user limits the search to one or more source agencies, rather than all agencies. When conducting analytical searches, the default setting is to search all agencies in the local system.
Neighborhoods can be viewed, edited or created in any of the following areas:
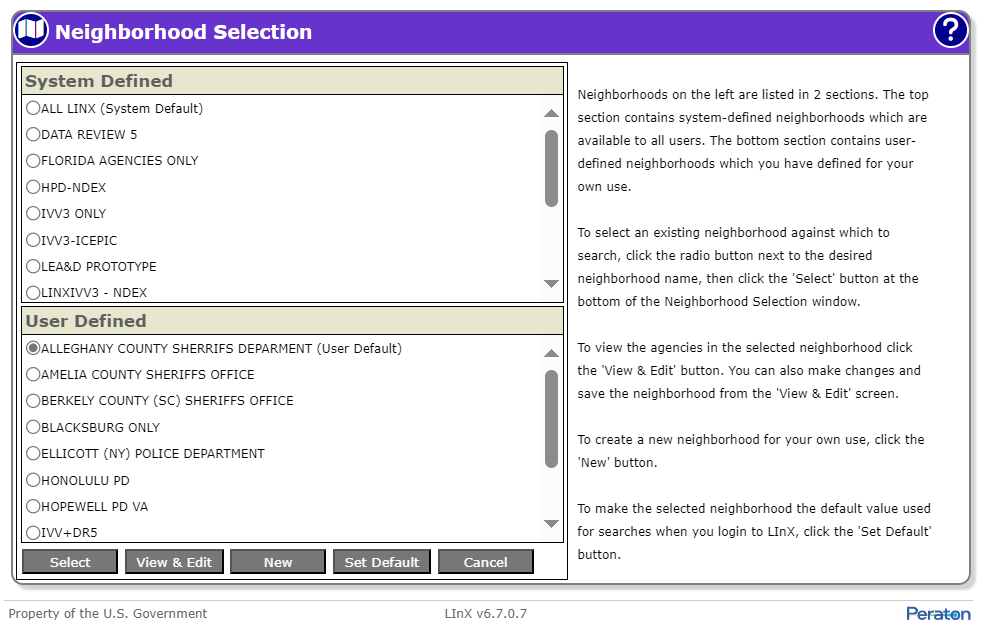
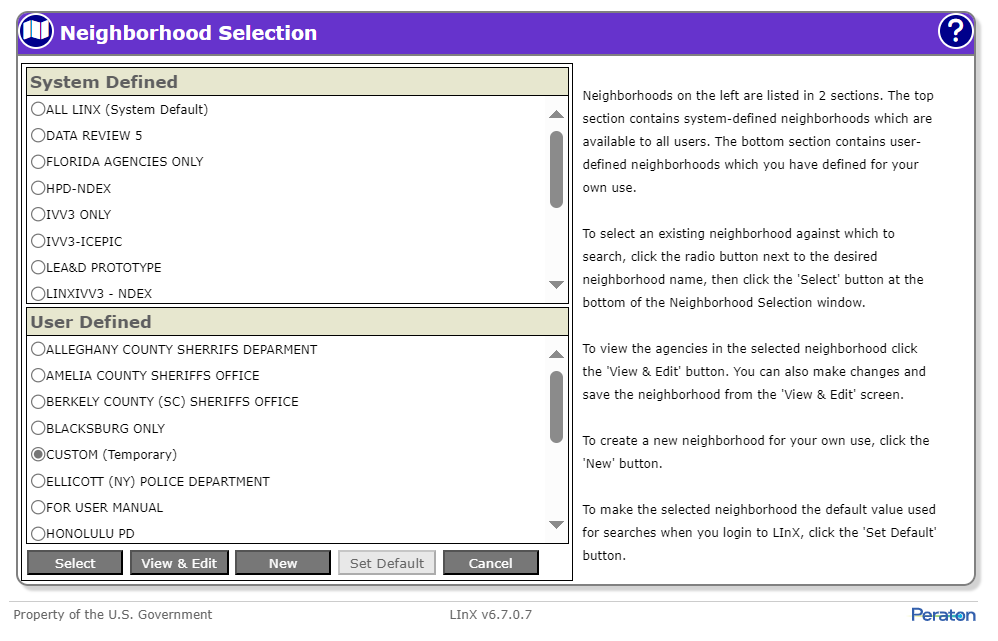
In scenarios 1 and 2, the Neighborhood Selection menu and a description of the screen functionality are displayed.
An overview of the neighborhood functionality is provided on the right hand side of the screen. If no neighborhoods are listed, or no neighborhood has been identified as a Default Neighborhood, then the local agencies of the current LInX system, plus whichever remote system(s) that may be included as default systems by the Regional Administrator, will be the default agency source criteria for all searches.
To select an existing neighborhood to search, click the radio button next to the desired neighborhood name, then click the Select button at the bottom of the Neighborhood Selection screen. The selected neighborhood will be activated, and the user will be returned to the screen from which Neighborhood Selection was chosen.
The most recent agency selection criteria will remain selected for subsequent LInX searches that support neighborhood selection within the current login session.
![]()
A LInX user has the capability to view the systems/agencies that comprise a particular neighborhood. A LInX user has the capability to edit the systems/agencies that comprise their own user-defined neighborhoods.
The Neighborhood View and Edit screens provide instructions on using the neighborhood editor. In addition, the screens contain a note about differences between LInX/D-DEx and partner systems search capabilities and the data returned from them.
To view a neighborhood, select the desired neighborhood by clicking the radio button next to the neighborhood name, then click the View & Edit button at the bottom of the Neighborhood Selection screen.
![]()
The View & Edit screen for the selected neighborhood and a description of the screen functionality are displayed; including an explanation regarding differences between LInX/D-DEx and partner systems search capabilities and the data returned by them.
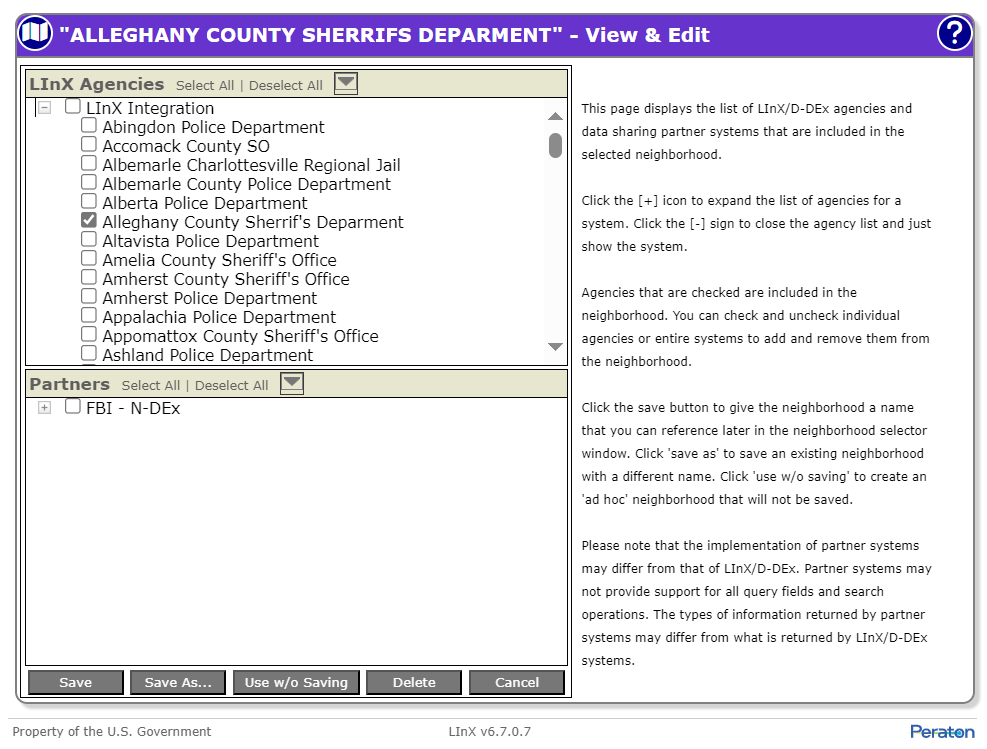
The View & Edit screen contains the list of LInX agencies and partner systems that currently comprise the selected neighborhood.
Note: High level system names in the LInX Agencies box where some, but not all, of the agencies in the specified neighborhood have been previously selected, are initially expanded when the View & Edit screen is displayed. A minus sign next to the system name denotes that the system has been expanded to show the list of agencies it contains. In the above example, LInX Integration is expanded to show that one agency from that system is included in the selected neighborhood (denoted by a check-mark next to each applicable agency name). Scrolling through the list is necessary to see all selected agencies in the system.
Each system can be expanded by clicking on the plus sign next to the system name to show the list of agencies contained within the respective system.
Clicking the Cancel button will return the user to the previous screen without making any changes.
A LInX user has the capability to customize their own existing neighborhood(s) by adding or removing available agencies and/or partner systems, then saving the edited neighborhood under the same or a different name.
To edit a neighborhood, click the radio button next to the desired neighborhood name, then click the View & Edit button at the bottom of the Neighborhood Selection screen. The View & Edit screen for the selected neighborhood and a description of the screen functionality are displayed.
The LInX Agencies section, located at the top left of the screen, contains a list of all LInX systems/agencies available to the user. The Partners section, located at the bottom left of the screen, contains a list of all partner systems available to the user.
The user’s ”Home” system can be found at the top of the agency selection list of LInX Agencies, followed by all additional LInX systems, listed alphabetically.
To view the agencies already included in the neighborhood, expand each of the LInX systems. The agencies that have a check mark next to their name are already included in the neighborhood.
Clicking the Cancel button will return the user to the previous screen without making any changes.
To include a LInX agency or partner in the selected neighborhood, check the box next to the agency name in the LInX Agencies section or the partner name in the Partners section.
![]()
.jpg)
Note: The systems listed under Partners can be added or removed separately from the agencies listed under LInX Agencies.
To exclude an agency or partner system from the selected neighborhood, deselect the box next to the agency name in the LInX Agencies section or the partner name in the Partners section.
![]()
.jpg)
To include all agencies within a LInX site, check the box next to the site name in the LInX Agencies section.
![]()
To exclude all agencies within a LInX site from the selected neighborhood, deselect the box next to the site name in the LInX Agencies section.
![]()
When the New Neighborhood View & Edit screen is initially displayed, all available agencies and partners are deselected. To easily select all the agencies and/or partners, click the Select All link located next to the LInX Agencies and/or Partners headings. To deselect all the agencies and/or partners, click the Deselect All link located next to the LInX Agencies and/or Partners headings.
![]()
![]()
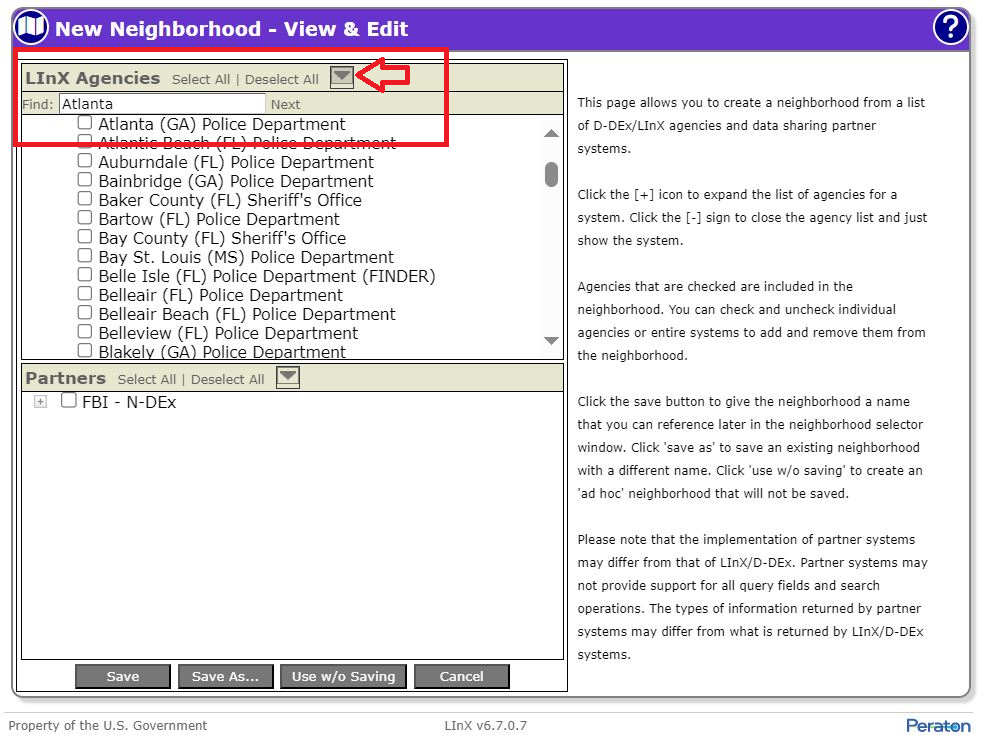
To locate an agency in Neighborhood Selection when the user is unsure of the system to which the agency belongs, click the envelope to the right of the LInX Agencies or Partners headings to display a Find: text box. Enter some or all of the agency name, then click Next. The system containing the first occurrence of the name will be expanded and the agency highlighted. If the highlighted agency is not the agency being sought, continue to click the Next link until the correct agency is found.
Once editing of the neighborhood is complete, the user may save the neighborhood using the existing neighborhood name by clicking the Save button located at the bottom of the View & Edit screen, which will update the neighborhood and return the user to the Neighborhood Selection screen.
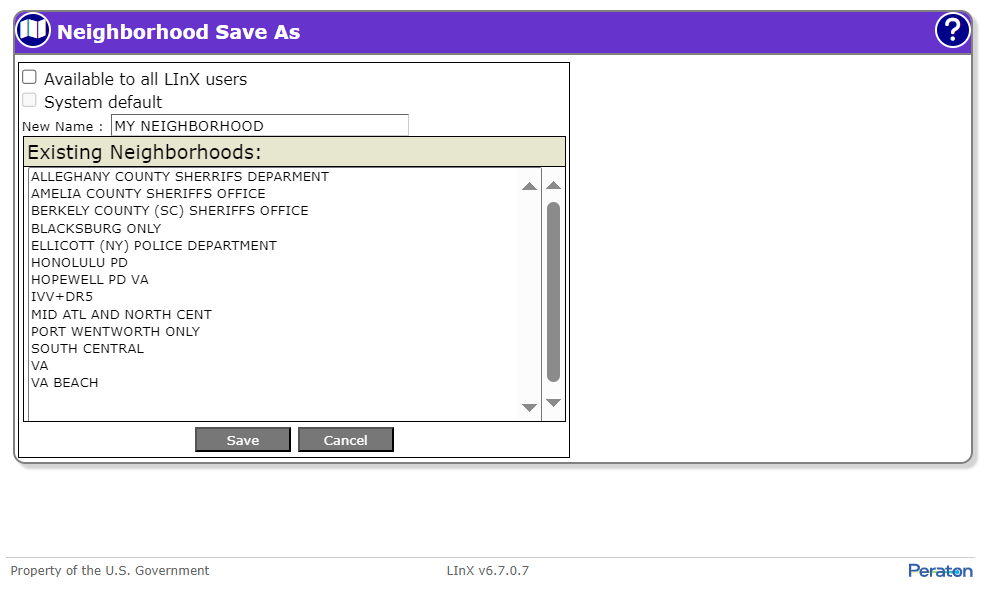
Alternatively, the user may save the edited neighborhood with a new name, thus keeping both versions of the neighborhood, by clicking the Save As button located at the bottom of the View & Edit screen, which will display the Neighborhood Save As screen. Enter the name under which the neighborhood is to be saved in the New Name text box, and click the Save button. Clicking the Cancel button will return the user to the View & Edit screen without saving any changes.
If the neighborhood has been saved with a new name and not designated as System Defined, the selection will automatically be created and added to the User Defined section of the Neighborhood Selection screen.
The user may also choose to replace an existing neighborhood with the newly edited neighborhood by selecting a neighborhood name from the Existing Neighborhoods box of the Save As screen. When an existing neighborhood name is selected, the name is populated in the New Name text box. By clicking the Save button, a confirmation box is presented. Click OK to continue to save the neighborhood with the selected name, or click Cancel, which will return the user to the Save As screen without saving any changes.

Note: If the user is a Regional Administrator, the neighborhood can be saved as a System Defined neighborhood by selecting the Available to all LInX users check-box. The neighborhood can also be set as the system default neighborhood by selecting the System default check-box. Only Regional Administrators are authorized to create or modify System Defined neighborhoods; therefore, the Available to all LInX users check-box is not available on the Save As screen if the user is not a Regional Administrator.
The LInX user has the capability to edit a neighborhood and execute a search using the edited version of the neighborhood without actually saving the neighborhood.
After all changes have been made to the selected neighborhood, click the Use Without (w/o) Saving button located at the bottom of the View & Edit screen. A Custom (Temporary Neighborhood) selection will automatically be created and added to the User Defined section of the Neighborhood Selection screen.

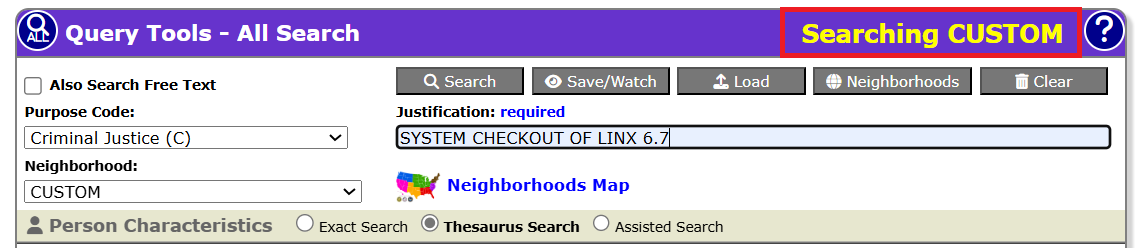
Click the radio button next to Custom (Temporary Neighborhood) if it is not already chosen, then click the Select button at the bottom of the Neighborhood Selection screen. The selected neighborhood will be activated, and the user will be returned to the screen from which the Neighborhood Selection was chosen. The Searching Status on any query screen will reflect that the Custom neighborhood will be searched.
The Custom (Temporary Neighborhood) will remain selected for subsequent analytical LInX searches that support neighborhood selection within the current login session.
To create a new neighborhood, click the New button at the bottom of the Neighborhood Selection screen. The New Neighborhood View & Edit screen and a description of the screen functionality are displayed. The New Neighborhood View & Edit screen contains a list of all Sites, Agencies, and partner systems available to the user to create a new neighborhood.
The user’s ”Home” system can be found at the top of the LInX Agencies list, followed by all additional LInX systems, listed alphabetically. Each system is collapsed, but can be expanded by clicking on the [+] sign next to the system name to see what agencies are contained within each system (see note under View a Neighborhood for additional information).
Note: By default, all agencies and partner systems in the LInX Agencies and Partners sections are unchecked. The methods used for selecting/deselecting Agencies, Sites, and/or partner systems are identical to those used to edit a neighborhood (see above for descriptions).
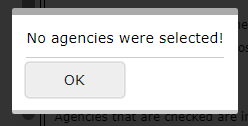
At least one agency must be selected before attempting to save or use a neighborhood. If no agencies are selected, the following error message will be displayed:
Once all agencies to be included in the new neighborhood have been selected, click the Save As button, which will display the Save As screen. Enter the name under which the neighborhood is to be saved in the New Name text box, and click the Save button. Clicking the Cancel button will return the user to the View & Edit screen without saving any changes.
Note: If the new neighborhood is to be a System Defined neighborhood, then the Regional Administrator should also check the Available to all LInX users box before clicking the Save button. Only a Regional Administrator can create a System Defined Neighborhood.
After the new neighborhood has been saved, the selection will automatically be created and added to the User Defined or System Defined section of the Neighborhood Selection window, as applicable.
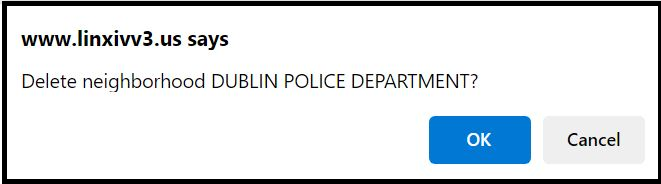
This capability allows a LInX user to delete any of their own user-defined neighborhoods. To delete a neighborhood, click the radio button for the desired neighborhood, then click the View & Edit button at the bottom of the Neighborhood Selection screen to display the View & Edit screen for the selected neighborhood. When the Delete button at the bottom of the View & Edit screen is selected, a pop-up confirmation window is presented. Clicking the Cancel button will close the confirmation window without deleting the neighborhood. Clicking the OK button will delete the selected neighborhood and return the user to the Neighborhood Selection screen.
Note: Only a Regional Administrator can delete a System Defined neighborhood.
The default neighborhood for all queries is all local agencies of the current LInX system, plus whichever remote system(s) that may be included as default systems by the Regional Administrator.
The LInX user has the capability to set any System Defined or User Defined neighborhood as their default neighborhood by selecting the radio button for that neighborhood, then clicking the Set Default button. The designated neighborhood will remain set as the default neighborhood for all subsequent searches for the current and future sessions, until the user selects another neighborhood to search or sets another neighborhood as the default.
![]()
|
Note: Setting a default neighborhood is not the same thing as selecting a neighborhood to be searched. Any available neighborhood can be searched, even if it is not the default neighborhood. |
In scenario 3, the Neighborhoods Map link appears on the All Search screen below the Justification field.
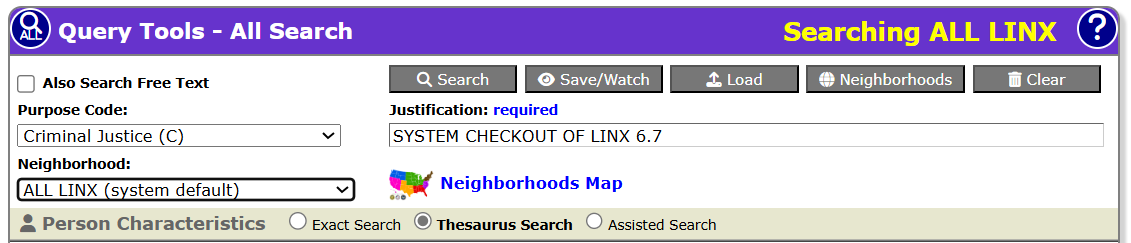
The Neighborhoods Map screen may be accessed from the Query Tools and All Search screens.
Clicking on the Neighborhoods Map link opens the Neighborhoods Map screen, with the most recently used neighborhood in the dropdown box for Load Neighborhood.
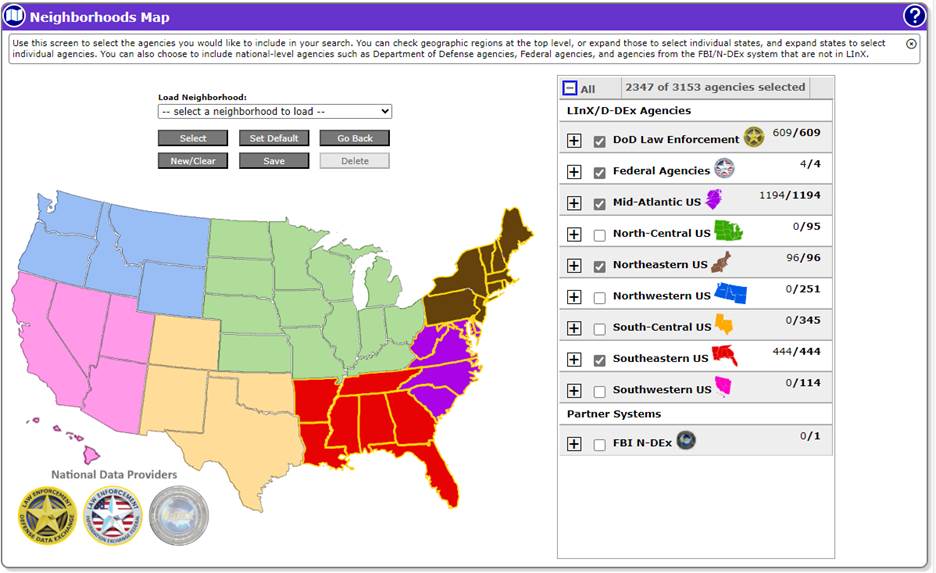
The Neighborhoods Map allows users to build a neighborhood by geographic regions instead of selecting LInX regions or agencies. The Neighborhoods Map incorporates a clickable map image with the following geographic regions:
|
Geographic Region |
LInX Sites Correlation |
|
Northeastern US |
Northeast |
|
Mid-Atlantic US |
NCR, Virginia |
|
Southeastern US |
Carolinas, Southeast, Florida |
|
North-Central US |
Midwest |
|
South-Central US |
Gulf Coast, Rio Grande, Rocky Mountain |
|
Northwestern US |
Northwest |
|
Southwestern US |
Southwest, Hawaii |
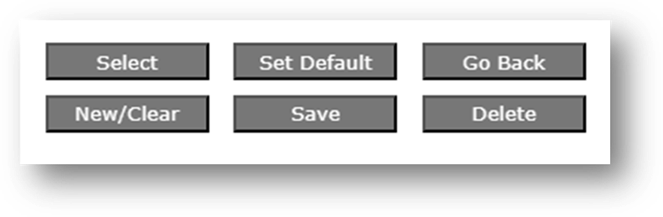
Users may also select the Set Default button to set the current neighborhood to their default neighborhood, which will persist through multiple logins until the user changes it.
Selecting the Delete button will delete the neighborhood, and selecting the Go Back button returns the user to the previous screen.
Users may select regions by clicking the map, or by using a dropdown list of the geographic regions to the right of the map. Expanding a geographic region allows users to select individual states. Expanding states allows users to select individual agencies.
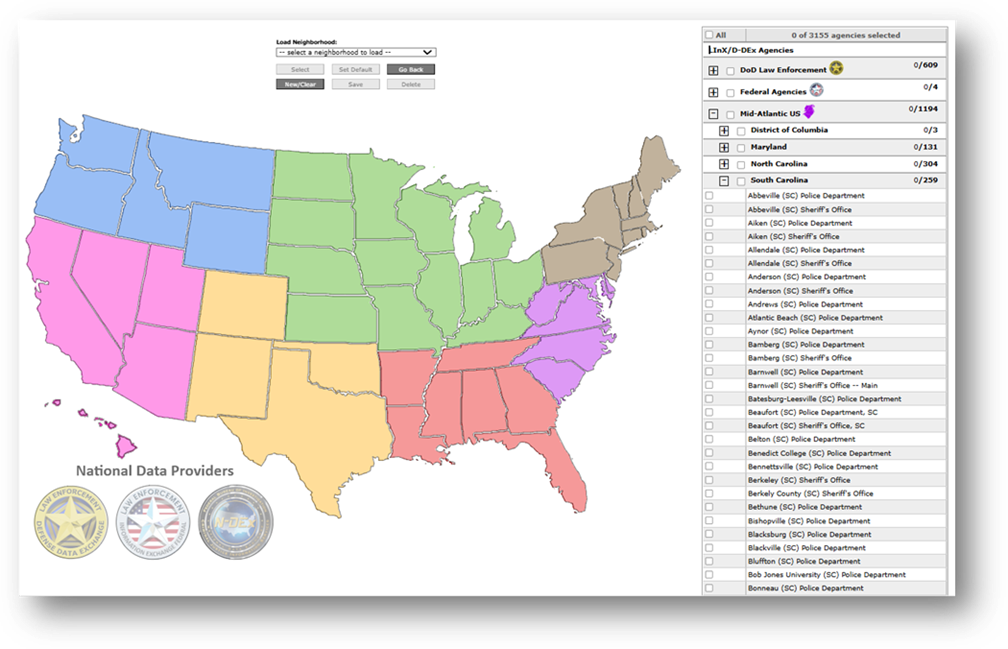
When selecting N-DEx State and Local Agencies, the list of LInX/D-DEx selected states to search will be passed to N-DEx as an exclusive filter. In the figure below, the state of Texas is selected, and N-DEx State and Local Agencies is selected. Searching with that neighborhood will limit results to agencies from Texas for both LInX and N-DEx.

Tactical and Analytical users should contact their System Administrator or Agency Administrator when they are having problems accessing or using LInX. Only System Administrators are authorized to contact the LInX Help Desk.